How to Turn a Storyboard into an AI Video
To turn a storyboard into an AI video, use its panels to guide the action, framing and order of the scene, while keeping character appearance and the final visual style clear. In Maosika, digital experts can prepare the storyboard and video instructions for you. You review the plan, generate a take and compare the footage with the scene you intended.
What should the video take from your storyboard?
A storyboard is a sequence of still images that plans how a scene will unfold. It can show where people stand, what changes between shots and which detail the audience needs to see. It does not show every movement between those moments.
Decide what the drawings are meant to carry. A pencil sketch can guide a realistic film without turning the final footage into a pencil animation. A simplified figure can mark a position without defining the actor's face or costume. Notes beside a panel can explain an action without becoming text on screen.
For a scene with recurring characters, Maosika is a useful choice because storyboarding sits alongside character design, location design and video-prompt preparation. Its 18 digital experts follow film production roles, helping you turn a scene into shooting instructions. You can review their work without learning to write every camera instruction yourself; experienced creators can edit prompts, replace references and control shots.
Read this six-panel scene before watching the result
The scene below takes place on a white-stone bridge above the clouds. A woman, Su Xue, raises a protective barrier. A man, Mo Han, strikes it, creating cracks. She warns that taking a magical flower will destroy the mountain's protection; he challenges her to choose what she is willing to sacrifice.
This is one confrontation from *Yaochi Snow*, produced on September 28, 2026 from an existing imported script. The example covers one scene, not a completed episode.
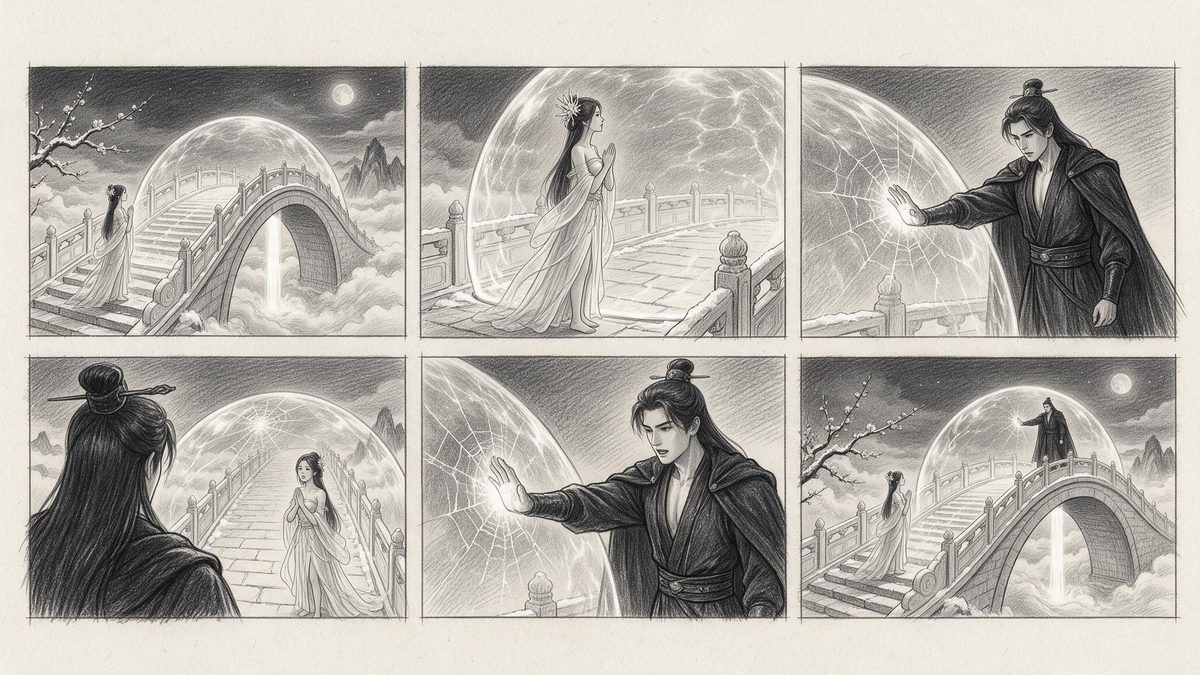
Read the panels from left to right, then move to the next row. Here is what each contributes to the plan:
| Panel | What is drawn | What that contributes to the scene |
|---|---|---|
| Top left | A wide view of the woman, bridge and dome | Establishes the setting and the barrier's scale |
| Top middle | The woman with her hands together | Shows who is maintaining the barrier |
| Top right | The man pressing his palm against the cracking surface | Shows the attack and its point of contact |
| Bottom left | The woman seen past the man's shoulder | Connects her response to the person threatening her |
| Bottom middle | A closer view of the man with his palm raised | Gives his challenge a distinct viewpoint |
| Bottom right | Both figures separated across the bridge | Returns to the unresolved confrontation |
The scene has a readable progression: establish the obstacle, reveal the attack, hear the response and return to the standoff. When reviewing your own board, ask whether that progression remains clear before worrying about decorative detail.
How does a drawing become shooting instructions?
The saved prompt for this scene opens with the following instruction, translated from Chinese:
Follow the six-panel storyboard from left to right, top to bottom. Do not adopt its sketch style, text annotations or placeholder figures.
This separates composition from appearance. The same prompt assigns the bridge location and the two character designs to separate image references. The board says how to stage the scene; those images supply the setting and character appearance. The original case study shows all four references.
The prompt then describes movement between the planned views. It opens with a wide push toward the bridge as the shield rises. Its next section describes movement toward the man, an over-the-shoulder view, dialogue and a final wide confrontation. Six drawings have become a connected camera plan, rather than six instructions to hold six still images for equal lengths of time.
It also adds information a drawing cannot supply: the order of the spoken lines, voice direction, the shield's resonance, the impact sound and music cues. These are instructions in the production plan. Their presence does not prove that every detail was rendered correctly.
You do not need to prepare an equivalent prompt before starting in Maosika. The historical record for this example reports that the expert-generated prompt was submitted without manual edits. Other scenes may need changes; your job is to approve whether the proposed action and camera plan express your intent.
What actually carried through into the video?
The delivered clip lasts about 15 seconds. Sampled frames near the beginning show the woman, bridge and golden dome. Later samples show the man from behind, a palm against the cracked shield with the woman beyond it, and a final wide view with the characters on opposite sides of the bridge.
That gives you several concrete connections between plan and footage: the setting, the barrier, the attack's contact point and the return to a wide confrontation. The final rendering has a realistic look rather than the board's pencil texture.
It is not evidence that all six panels became six matching shots. The sampled views combine or alter some of the board's compositions. The prompt specifies dark flame around the hand; the sampled output shows warm red light and flame there. This is exactly the kind of difference to catch when deciding whether to keep a take.
The frame review does not verify the complete dialogue, lip sync or motion between samples. Watch the full scene with sound to make those judgments. A recognizable image from the board is only one part of approval.
How should you review and revise your own scene?
Maosika's storyboard artist prepares a scene board and a shot list from the script and visual references. When the storyboard is used for video generation, it becomes the first visual reference and the digital experts prepare the video prompt in its shot order. This is the supported route illustrated here; the example does not establish that any externally drawn storyboard page can be uploaded and reproduced automatically.
Use the assistance to make decisions in stages:
- Approve the action in the board. Can you see who does what, what changes and where the scene ends? Ask for a change if an essential reaction or action is missing.
- Review what the prompt takes from it. Check shot order, character positions and the intended final look. A sketch's line work should not become the final style unless that is what you want.
- Compare the take with the important decisions. Check the action and reaction, the contact point, the character identities, the dialogue and the ending. If a camera angle changes, judge whether it still tells the scene clearly.
- Choose what to keep and finish the sequence. You select the takes and confirm unwanted sections. Maosika supports trimming the beginning, end or middle, then merging and exporting, with fades, dissolves and audio crossfades.
When an output misses the intended action, review the relevant board, prompt and reference before generating another take. When the action works but an unwanted opening or ending remains, trimming may be the appropriate decision. These are suggested review choices; the creator makes the final call.
Start a story project in English and use one scene to approve the relationship between the board, the shooting plan and the footage before expanding the production.
FAQ
Will a pencil storyboard make the video look like a sketch?
It does not have to. In this example, the prompt explicitly takes composition and order from the pencil board while using separate character and location references for a realistic scene. Review the style instructions as well as the drawings.
Does each storyboard panel become a separate video shot?
Do not assume a one-to-one match. This six-panel example uses a connected camera plan, and the sampled output combines or changes some compositions. Check whether the action, relationships and intended ending survive, then decide whether any difference needs a revision.
Can I bring any finished storyboard sheet into Maosika?
The verified workflow here uses the storyboard prepared for a scene within Maosika, followed by video-prompt preparation and generation. This case does not verify arbitrary external storyboard-page import. It shows how a scene board can guide footage when used with its corresponding script and visual references.
About Maosika — Maosika · Professional AI Video Production System. It connects briefing, scripting, look development, shot prompts and delivery into one reviewable pipeline. www.maosika.com